This T-Post Raspberry trellis post is a follow-up to my Transplanting Raspberries to a Raised Bed in Kentucky post. And Part of my Kentucky Raspberry growing series. If you missed my latest post, I transplanted six Tula Magic floricane raspberries into a 3×8 galvanized raised bed on my Zone 7 ridgetop homestead in early March.

If you read my last post, you know I ended it with a promise — the trellis was coming. The raspberries were in the ground, the buds were swelling, and those canes were going to need support sooner rather than later. But true to the homestead life here at Bloom and Peck, I wasn’t going to waste a trip and run to the store for just one thing. I was working with what I had.
Do Raspberries Need a Trellis?
Yes — and especially in a raised bed. Raspberry canes can grow 4–6 feet tall, and without support, they flop, tangle, and become a nightmare to harvest. (You know those plants have pokies!) In a raised bed where you’ve got plants spaced down a narrow center row, unmanaged canes will sprawl out in every direction fast. I just planted these a couple of days ago, and they are already getting bigger! Awesome right?!
A trellis keeps canes upright, improves airflow (which matters a lot in Kentucky’s humidity and helps prevent disease), and makes picking so much easier. It doesn’t have to be fancy — mine definitely isn’t. The nice thing about the 3×8 bed size is It can grow bigger and be flexible to more raspberry plants.
What Kind of Trellis Is Best for Raspberries in a Raised Bed?
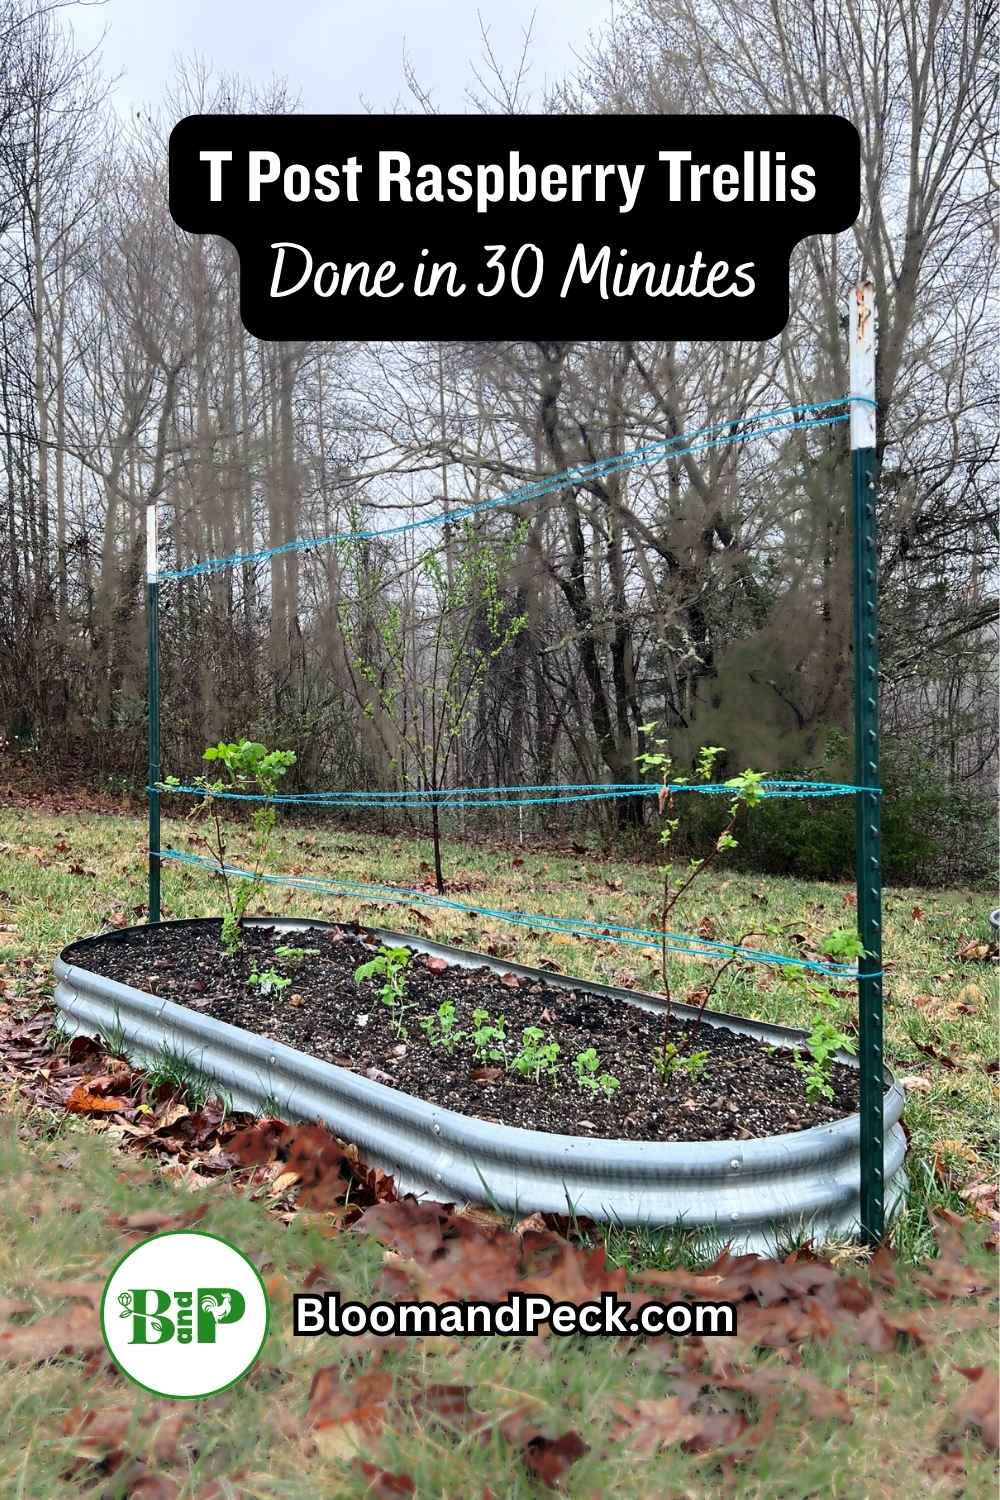
I went down a rabbit hole on raspberry trellis ideas after my transplanting post. Seriously, more than 2 cups of coffee worth. There are quite a few systems out there — the I-trellis, V-trellis, T-trellis — but for a simple 3×8 raised bed with 6 plants, I landed on a t post raspberry trellis with wire looping around both posts to form a perimeter around the bed (sometimes called a loop trellis or fence trellis).
The idea is simple: one T-post at each end of the bed, with wire running down both long sides forming a long oval around the plants. The canes grow up through the middle and lean against the wires on either side for support. No complicated crossbars, no fancy hardware, no kit needed.
This isn’t a textbook system — it’s a homestead solution. And it works perfectly for a short raised bed.
What I Used (All Things I Already Had, Mostly)
This build cost me $14 for clothesline wire, because I raided what was already on the property:
- 2 metal T-posts, 7 ft each
- 1 post pounder (you could do this with a Sledgehammer, I’m a clutz, so I opt for the pounder)
- Heavy gauge clothesline (~100 ft)
- Wire cutters
- Pliers for pulling, but not necessary.

That’s it. If you’re starting from scratch, T-posts run about $5–9 each at Tractor Supply hardware or home improvement stores, and a roll of 100ft 10-gauge clothesline wire is under $16. Total build cost from scratch: under $25. You don’t HAVE to have a post pounder, but I would break a leg with a sledgehammer! These things you can probably find on FB craigslist or marketplace too.
🌱 Growing in Kentucky too? Grab my free Kentucky Vegetable Planting Calendar — realistic planting dates for Zone 6 & 7, from a fellow Adair County gardener, figuring it out one project at a time.
T Post Raspberry Trellis Dimensions: What Size Do You Need?
For a 3×8 raised bed, here’s what worked for me:
- Post height above soil: 5 feet (worked out to 6.5′-7′ t post)
- Lower wire height: 18 inches above soil
- Middle wire height: (I did not find this in reading; my plants just seemed to need the support at this stage)
- Upper wire height: 42–48 inches above soil
- Wire length needed: About 17–18 ft per loop (8 ft each long side + a little extra to wrap the posts)
These raspberry trellis dimensions give you plenty of support for canes that will eventually reach 4–6 feet. If your bed is longer than 8 feet, plan to add a middle post to keep the wire from sagging. If I upgrade plants and bed size, I’ll upgrade the setup to a T-Trellis.
How to Build a T Post Raspberry Trellis: Step by Step
Step 1: Pound the T-Posts
Place one T-post centered on each short (3 ft) end of the raised bed. Drive them down, on the outside of the bed, until you have about 5-6 feet of post standing above the soil. The post pounder made quick work of this — even through the Kentucky ridgetop soil.
Pro tip: T-posts have little metal tabs (nubs) on the face of the post. Make sure they face outside the bed so your wire can rest between them.

Step 2: Run the First Wire Loop
Make a small simple loop and twist the wire on it self (see picture below) Do a simple wrap of wire at the base of one post, run it down one long side of the bed at 18 inches above the soil, loop it around the far post (look for those nubs to hold the wire in place), come back down the other long side, and tie it back where you started — one continuous oval. This lower wire corrals young canes and keeps them off the soil.

Pro tip: T-posts have little metal tabs (nubs) on the face of the post. Hook your wire behind them at each height, and it won’t slide down. Don’t skip this.
Step 3: Run the Second Wire Loop
This is where I deviated from the norm. My plants are not strong, yet I felt I should make 3 wires to train them. So my second wire is about 28″ As my pot-growing TulaMagic raspberry plants are not super straight or thick canes, as of yet. The norm says:
Step 3 Third Wire: Same process at 42–48 inches above the soil. This is your main load-bearing wire.

Step 4: Tension Wire
Hand tension is completely fine for an 8 ft span. No turnbuckles needed. I used pliers to pull the wires tight and looped the wire through and wrapped the extra back on itself. I can tighten and move the wires to adjust them as needed.
Step 5: Tuck raspberry plants into the wire perimeter
Carefully tuck the canes of the berry plants between the perimeter wires. The wires help support the canes as they grow. This keeps the berry vines from sprawling all over, keeping them healthy.

End of Project:
The whole thing took about 30 minutes, including time spent wrangling the clothesline spool. That stuff will come unraveled and tangles like it hates you. I tried to shoot a video and did not pay attention to my wire, took me 5 min to get it all rolled up again. Opps!
Pro tip I learned the hard way — unroll a generous length of clothesline in a straight line with the roll always in your hand BEFORE you start running it around the posts. Give yourself some slack to work with and the spool stays manageable.
How the Budget T Post Raspberry Trellis Looks and Works
The finished t post raspberry trellis creates a long oval frame around the bed. As the Tula Magic canes grow taller, I tuck them behind the wires or tie loosely with jute twine. Airflow through the bed is good, I can walk both sides to harvest, and nothing is flopping into the path.

For six plants in a 3×8 bed, this is plenty. A longer bed would require a middle post for wire support.
What I Might Change
A few things I’m watching:
🌻 Post stability — T-posts without a tether to keep them straight up and tention on the wire. So far solid, but a heavy cane load in year two might change that. I may have to use a tent stake and tension them. Keeping an eye on how they do.
🌻 Wire height — With this easy setup, I am able to move the wires up and down in a couple of minutes. I can move them to whatever height the raspberry plants need support.
🌻 Clothesline durability —Some homesteaders swear by baling twine as an alternative — cheap, easy to restring, and holds up 2–3 seasons. My issue here is that I honestly wanted it to look a little better and last longer. I’ll report back.
🌻 Tension – I may add turnbuckles if I can find some on budget to help tighten the wire. It is very thick at 10 gauge, and if I run it into another raised bed, I will definitely need more wire tension to support the raspberry plants.
What’s Next for the Raspberry Bed
Now that the trellis is up, the next project is shade cloth before the Kentucky summer hits — Tula Magic does not love the heat of the Kentucky full afternoon sun. I’ll also be putting in some living mulch (thyme and nasturtium along the edges). (I already put some peas in because my other garden bed wasn’t ready) I am again deep diving on what is going to look ok, cost less, and prevent a few issues I found last year in my potted raspberry plants. Links coming as soon as those posts are up.
Frequently Asked Questions: T Post Raspberry Trellis
Yes. Without support, raspberry canes flop, tangle, and are hard to harvest. A simple trellis keeps canes upright, improves airflow, and makes berry picking much easier — especially in humid climates like Kentucky.
For a home raised bed, a simple t post raspberry trellis with two wire loops is the easiest and most affordable option. For larger in-ground rows, a V-trellis or I-trellis gives better cane separation and light exposure. See references below for more details
For a 3×8 bed: posts at 5 ft above soil, lower wire at 18 inches, upper wire at 42–48 inches. For a longer bed, add a middle post and keep wire spans under 10 ft to prevent sagging.
12.5 or 14 gauge galvanized wire is the standard recommendation and holds up well outdoors. I opted for the coated 10-gauge clothes line wire, it’s super strong, budget-friendly, and I did not break it when twisting like hot wire. Baling twine is a popular budget option for the lower wire.
Use 6–7 ft T-posts so you end up with at least 5 ft of post above the soil after setting them. Raspberry canes reach 4–6 ft tall at maturity.
Not necessarily. You can pound them into the bed soil or bolt them to the inside of a wooden bed frame. For a short 8 ft bed, the wire tension is low enough that secure placement in the soil is plenty.
Hook the wire behind the metal tabs (nubs) molded into the face of the T-post at your target height. These are designed exactly for this and lock the wire in place without any clips.
Sources & Further Reading
- NC State Extension — Trellis Systems for Caneberries
- University of Kentucky Extension — Growing Blackberries & Raspberries in Kentucky HO-15
- Growing Fruit Community — Raspberry Trellis Systems
Growing Raspberries in Kentucky on a budget? Drop your trellis builds or comments below, I’d love to or hear about what you built!