
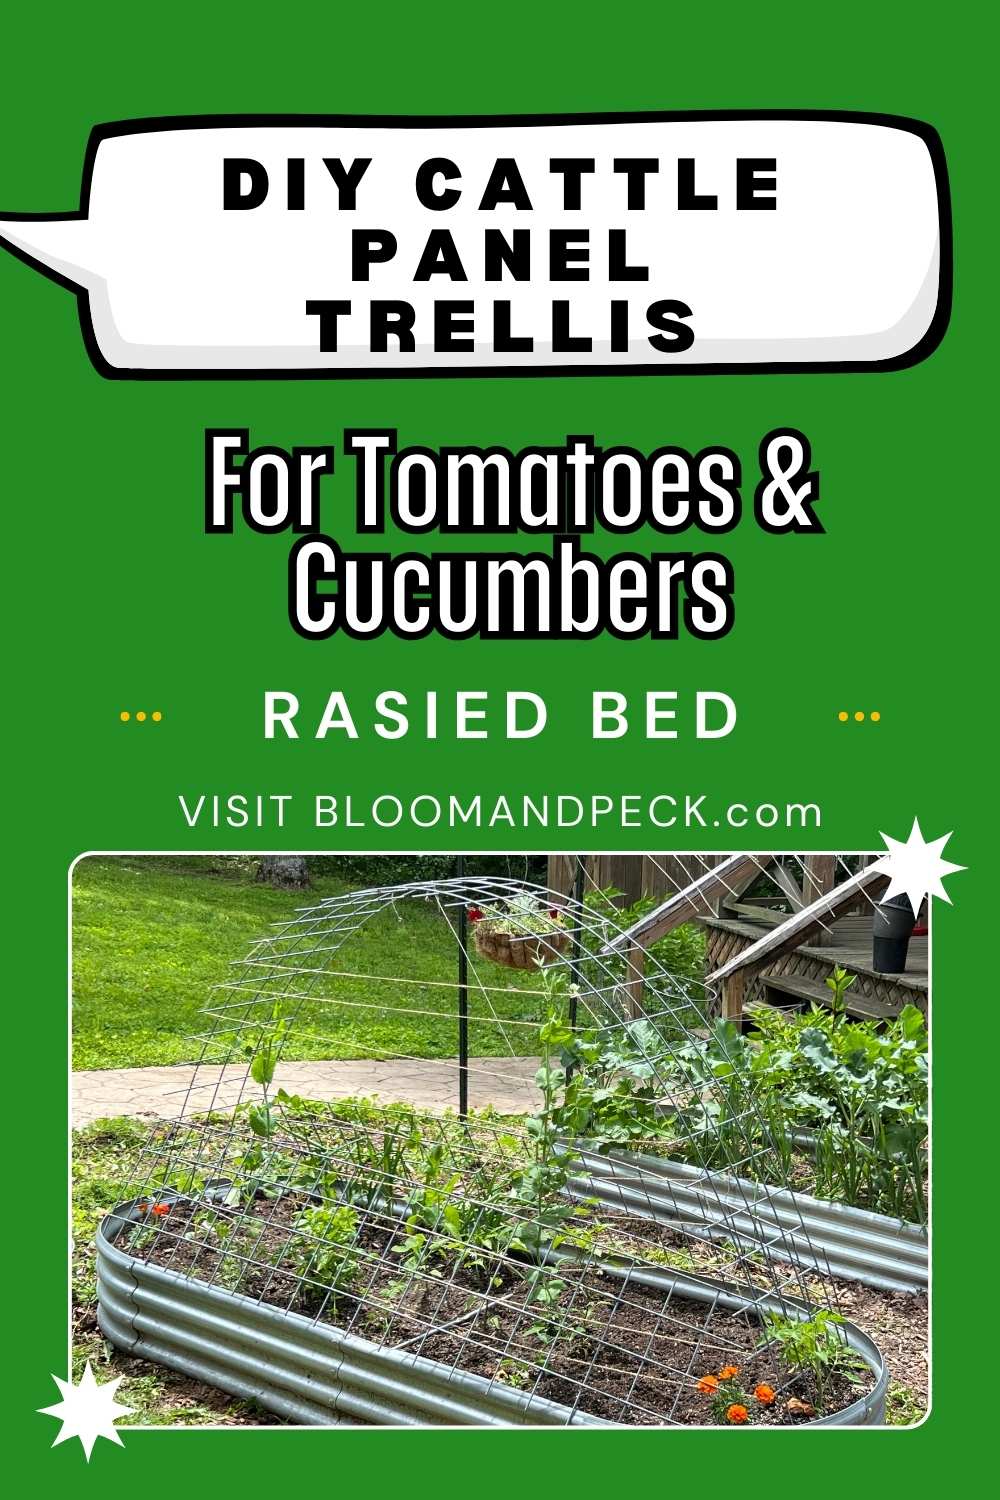
If your tomatoes flop over every summer, a cattle panel trellis fixes it for good. It’s a budget arch of livestock fencing that carries a fully loaded tomato vine without sagging the way cages, string, or concrete mesh do — and it looks beautiful doing it. I built mine as an arch over a raised bed here in Zone 7 Kentucky, and as th and it’s held through wind, rain, and a full fruit load since last year.
I’ll show you how to build it two ways — anchored in a raised bed (no stakes needed) or in the ground with T-posts — so it works for whatever setup you’ve got. Same panel, same arch, two ways to hold it up. Below you’ll find the materials, the cost, how I shaped the bend, how I planted underneath, and how to keep the tomatoes climbing.

Quick Answer: Building a Cattle Panel Tomato Trellis
- Panel: One 16-ft cattle or hog panel (cut to fit your bed width)
- Anchoring: Raised-bed frame holds it (no stakes needed), OR 4 T-posts if in-ground
- Best shape: Arched — sturdy, pretty, and you can walk/reach under it
- Holds: Tomatoes, plus cucumbers, pole beans, squash, small melons
- Cost: $50 and up if you’re buying new cattle panel, raised bed, and tools: upcycling will be less.
- Time: About an hour (more if building new raised garden bed)
- Zone: Built and tested in Kentucky 7a
Why a Cattle Panel Trellis Beats Tomato Cages
Tomatoes — especially vigorous indeterminate types — get heavy and tall, and flimsy cages buckle right when the fruit sets. A cattle panel trellis is a one-time, budget-friendly fix: 4-gauge galvanized wire that doesn’t bend under weight, lasts for years, and doubles as a gorgeous arch in a raised bed. I can start peas up it in the early spring then transplant in tomatoes when they are finishing up.
Unlike tomato cages or concrete reinforcing mesh, this handles a heavy fruit load and creates a focal point in the garden. It’s also customizable to any bed size, so it works in small spaces. as you will see below.
Why a Cattle Panel or Hog Panel Trellis Is Perfect for Raised Garden Beds
Tomatoes, especially vigorous Roma varieties, need robust support to thrive. A hog panel trellis, similar to a cattle panel trellis, is a budget-friendly, durable solution that adds a charming arch to your raised garden bed.
Technically, I was a on a budget, and had the hog panel left over from my porch project, so I used it! The 4″ squares are perfect for tomato vines an I am planting cucumbers at the other end.
It’s customizable for any bed size, ideal for small spaces. I used left over wire hog panels (4″ squares, 16″ tall, and 16′ long) from my porch project, but you can source them from feed stores or repurpose used sections from Marketplace for sustainability. Yes you can also use a Cattle Panel to make this trellis.
Hog Panel vs. Cattle Panel: What’s the Difference?
Both work for tomatoes — the difference is hole size and height, and it changes what else you can grow on it.
- Hog panels: 4″×4″ squares top to bottom, 36–48″ tall (some have smaller squares at the bottom so piglets can’t slip through). Great for smaller vining crops — tomatoes, cucumbers, peas.
- Cattle panels: Taller at 50″, with graduated 8″×4″ to 8″×6″ rectangles. Better for bigger, heavier vines like squash and melons — but they work fine for tomatoes too.
Both come in 16-ft lengths, so either one bends into an arch. I used leftover hog panel (4″ squares) from my porch rail project — the smaller squares are easy to weave tomato vines through. For my squash, I’ve used cattle panel because the bigger openings make room for chunky vines and fruit.

Materials for Your DIY Tomato Trellis
Here’s what I used to create my arched trellis:
- Cattle /Hog / Livestock Panel: A 16-inch wide strip cut from a standard 4×16-foot panel using bolt cutters. Sounds a little intensive, but it made sitting and cutting pretty easy. These sections were also repurposed from my section of porch railing so I was able to have no waste.

- Optional 3×8 Metal Raised Bed: I used a raised bed that was gifted to me, but for future projects, I’d like to try the Birdies raised beds from Epic Gardening for its durability multiple size and shape options.

- T Posts: If planting in ground you will need 4 posts for one arched panel. I like a 5 foot post.
- Tools: Bolt cutters, gloves, and a measuring tape. I got a short pair of bolt cutters from harbor freight a few years ago, when my good idea fairy mind had me making barbwire wreaths 😄

Your panels will range in price in your area but you can source them from feed stores, feed mills, and sometimes hardware stores.
You can even find small sections or used sections on Marketplace to save more. If ya don’t have a pick up this might be a good option, if ya can sweet talk someone into delivering.
Step-by-Step: Cattle Panel Trellis 2 Ways
I built these cattle panel trellises for different situations in my gardening journey.
The raised bed was right after I had surgery, and the garden was my mental escape. This option allowed me to have a kitchen garden outside my door, and I could sit my chair next to it for easy access.
The inground Arched cattle panel was my next step. I had a larger garden and grew heirloom indeterminate tomatoes up the and determinate in the middle. I learned a lot from my mistakes and successes here.
Building a Different Arched Cattle Panel Tomato Trellis in a Raised Bed
1. Cut the Hog Panel: Using bolt cutters, I trimmed a 4×16-foot hog panel to a 16-inch wide strip (4 squares). This fits across the 3-foot width of my raised bed. Your width may vary. Measure twice cut once!
2. Shape the Arch: I inserted one end inside the 3×8 raised bed, letting the frame hold it securely. Then, I bent the panel into an arch, tucking the other end into the opposite side. I kept the arch low enough to reach from a stool or standing. It was pretty easy to do by myself.

3. Secure the Base: Fill in the bed with soil, this will put weight on the trellis and press it against the frame of the bed. The bed’s metal frame keeps the panel in place—no stakes needed!
4. Check Stability: Shake the trellis gently, then fill in soil mix. Mine’s held up 2 years through wind and rain and snow. I had to move the bed so this one was repurposed.
This took me about an hour due to my physical restrictions, (not including building the raised bed) but you might be faster. Unlike the straight trellis in my Mother’s Day garden , this DIY arched trellis adds a unique visual, adds bed space for more planting, and maximizes vertical space.
Traditional DIY Tomato Arched Cattle Panel Trellis

- Space your 4 T Post-I like mine 50″ width (the same as my cattle panel) and 5 foot across with the nubs inside. A short post is good if using one person, and step 3 is why. This will help secure the panel.
- Pound your posts in with either a Post Pounder or a Sledge hammer. Save your shins and find a post pounder. (I also do that in my Raspberry T Post build) Inside tip, keep the post nubs on the inside of the arch.
- This is the tricky part, if you have a helper perfect if not, get ready. Place one end of the panel against the inside of two of the post, then walk the other end in making it bow. And push the end you are holding up over the posts the next two posts.
It’s a little bit of garden yoga, but keep calm and it will work. - Slide the cattle panel down to the ground parallel the two post and set on the ground.
- Once it is set on the ground against all 4 posts, secure the zip ties (or t post wire ties) around the nubs to help reinforce the arch.
🍅 Growing Tomatoes in Kentucky?
Grab my free Zone 6 & 7 Tomato Planting Guide — real variety recommendations, region-specific dates, and the mistakes I already made so you don’t have to.
Prepping Kentucky Clay Soil
If you garden in our heavy Kentucky clay, don’t skip this. Tomatoes want well-drained, loamy soil around pH 6.2–6.8, and clay fights you on drainage. I spent a year mulching and covering the area to improve it, then amended with compost and raised the bed a few inches so water moves through instead of pooling. Mulch on top keeps moisture even and stops soil from splashing up onto the leaves (which spreads disease).

Planting the Tomato: The Trench Method
To give my tomatoes a strong start, I planted it using the trench method (inspired by Growfully with Jenna) — burying the stem horizontally so it roots along its whole length for a bigger, stronger root system.
- Prepare the Plant: My Roma tomato was potted up in Epic Gardening’s 5″ cube pot, which promotes air-pruning and healthy root development. The deep, square design gave the plant a head start before transplanting.
- Dig the Trench: In the raised bed, I dug a 6-inch trench under the trellis arch deep enough at one end for the roots and enough to bury the stem at least 4″
- Plant Horizontally: I laid the Roma tomato’s stem horizontally in the trench, leaving only the top leaves above soil. I gently guided the top through a hole in the cattle panel to direct its upward growth.
- FEED the tomato plant: Jenna recommends feeding the soil if your soil is poor, like my raised bed (it’s a second year bed and I am starting it fresh) with non synthic fertilizer. I amended with some of my compost and I used Dr Earth Organic Tomato Fertilizer
- Cover and Water: I covered the stem with soil, making it nice and cozy and watering.
This method suggests a robust root system, which means more tomatoes later! See the method here with Jenna:
Holding Tomatoes Up: Florida Weave vs. Vertical String
Once your tomatoes climb, you need to keep them ON the trellis. Which method depends on the tomato:
- Determinate tomatoes (like Roma): The Florida weave works well — run twine in a figure-8 between the plants and your T-posts/panel, adding a new line up the plant as it grows. Fast and tidy for shorter, bushier plants. (Even my determinate Romas needed tying up — determinate doesn’t mean self-supporting.) I prefer a string method though if I am pruning.

Roma tomatoes will thrive in a string or cattle panel trellis and trench method setup, whether determinate (bushy, 3-4’ tall) or indeterminate (vining, up to 6-8’ tall).
- Indeterminate tomatoes (like Cherokee Purple): These vine 6–8 ft and want vertical training— clip or loosely tie the main stem to a string or up the panel and let it climb. This keeps vines off the ground, improves airflow, and cuts disease.

This trellis supports both, with 4″ squares for weaving taller vines. The trench method boosts root growth, creating a stronger plant for Roma’s meaty, plum-shaped fruits, ideal for sauces.The Epic Gardening 5″ cube pot preps a dense root system, while the raised bed ensures drainage and warmth, loved by Romas in my Zone 7 garden.
I planted marigolds around the base to deter pests, as outlined in my companion planting series, and added basil nearby for flavor synergy.
Care Tips for Tomato Success
- Water consistently — deep watering every few days; tomatoes hate drying out then flooding. A soaker hose under mulch is efficient.
- Train as it grows — tie or weave the vine to the panel every week or so.
- Mulch — straw or wood chips hold moisture and cut weeds.
- Watch for hornworms — check in June through September, hand-pick them, and plant basil nearby as a deterrent.

- Check the trellis after heavy wind or rain to make sure it’s still snug.
What Else You Can Grow on a Cattle Panel Trellis?
The best part of a cattle panel arch is that it’s not just for tomatoes. On the other end of mine I grow cucumbers, and I’ve used the same style for other crops:
- Cucumbers — climb it beautifully. Cucumbers on cattle panels
- Thelma Sanders & winter squash — cattle panel (bigger holes) is better for these. Vining Squash on Cattle Panel
- Pole beans, small melons, cantaloupe — all happy on an arch. Cantaloupe on Cattle Panel Trellis
This raised bed trellis maximizes space and fosters a vibrant polyculture by supporting companion plants like marigolds, basil, snap peas, and jalapeño peppers in my 3×8 raised bed. Marigolds deter pests, basil enhances tomato flavor, snap peas bring nitrogen, and jalapeños thrive alongside.

FAQ: Your Tomato Trellis Questions Answered
Mostly it is the size of the squares and the height of the panel itself. Hog panels are usually 4″x4″ squares from top to bottom and are 36″-48″ tall. Some Hog panels have a graduate small square on the bottom so baby pigges can’t escape. Great for smaller vining fruits and veggies.
Cattle panels are usually 50″ tall and graduated 8 in. vertical x 4 in. horizontal to 8 in. vertical x 6 in. horizontal rectangles. Works nice for larger things like squash, but also works for the smaller stuff too.
Yes, especially indeterminate varieties like some Romas! A hog panel trellis keeps plants upright, improves air circulation, and boosts yields.
Absolutely! It works great for cucumber trellis, which I planted at the opposite end of the trellis, pole beans, or my favorite Thelma Sanders Squash.
If the plant starts leaning or the trellis wobbles, add soft ties or check that the panel is secure in the bed. If it’s not in the soil you will have to stake the trellis.
The trench method boosts root growth, which can lead to stronger plants and more fruit, especially for indeterminate varieties.
Marigolds deter pests, while basil enhances flavor. Try snap peas, onions, peppers, even lettuce for a polyculture bed, as I did!
I wrote all about my favorite tomatoes to grow in Kentucky. Link is HERE
Some links in this post are affiliate links (but not all). This means if you click and buy, I might earn a small commission at no extra cost to you. Your support helps keep my garden dreams growing—Now let’s dig in.
References
- Growfully with Jenna. (2024, April 24). How to plant tomatoes using the trench method [Video]. YouTube. https://youtu.be/u55JFK6LIsI?si=Qxj3yoizrtCS6sId. Accessed May 24, 2025.
- Backyard Eden. (n.d.). How to grow tomatoes vertically. https://backyard-eden.com/how-to-grow-tomatoes-vertically/. Accessed May 24, 2025.
Leave a Reply